Balder's Tips for deep cleaning your home
Deep cleaning can often feel like an annual cleaning marathon, a chore to be escaped if possible, but it doesn't have to be that way. With the right preparations and tools, you can divide the work into manageable parts that fit into your daily routine.
Whether you prefer to tackle it all in a weekend or spread the tasks out over several weeks, our guide will help you plan and execute your deep cleaning with minimal stress.
So grab your bucket, water, and floor mop, put on your cleaning gloves, and let's make your home sparkling clean together with "Balder's Tips for Deep Cleaning Your Home".
General Advice Before Starting Deep Cleaning:
Before diving into the actual cleaning, it's a good idea to go through each room to remove unnecessary items. By decluttering first, the cleaning process becomes easier and more effective.
When you start cleaning, it's most practical to begin from the top of the room, such as ceilings and high shelves, then work your way down. This method ensures that dust and dirt fall onto surfaces that haven't been cleaned yet, making it easier to ensure a thorough cleaning of the entire room.
Choose cleaning products that are both suitable for your home and the environment:
When choosing cleaning products for your deep cleaning, it's crucial to make choices that not only ensure a clean home but also consider the well-being of both residents and the environment. Start by looking for products bearing environmentally friendly certifications such as the EU Flower or the Nordic Swan Ecolabel. These products are not only gentle by minimizing exposure to harmful chemicals like phosphates and parabens, but they're also designed to be gentle on the environment. Natural ingredients can be excellent alternatives to traditional cleaning products as they can effectively tackle many cleaning tasks without leaving harmful fumes or residues.
It's also important to consider the suitability of the cleaning products for the specific areas and materials you plan to clean. Surfaces like wood may require milder cleaning agents to avoid damage, while more robust materials like tiles and ceramics can handle stronger solutions. Following the manufacturer's recommendations ensures that you choose the most effective product for the task without risking damage to the surfaces.
Maintain optimal hygiene with deep cleaning of your kitchen:
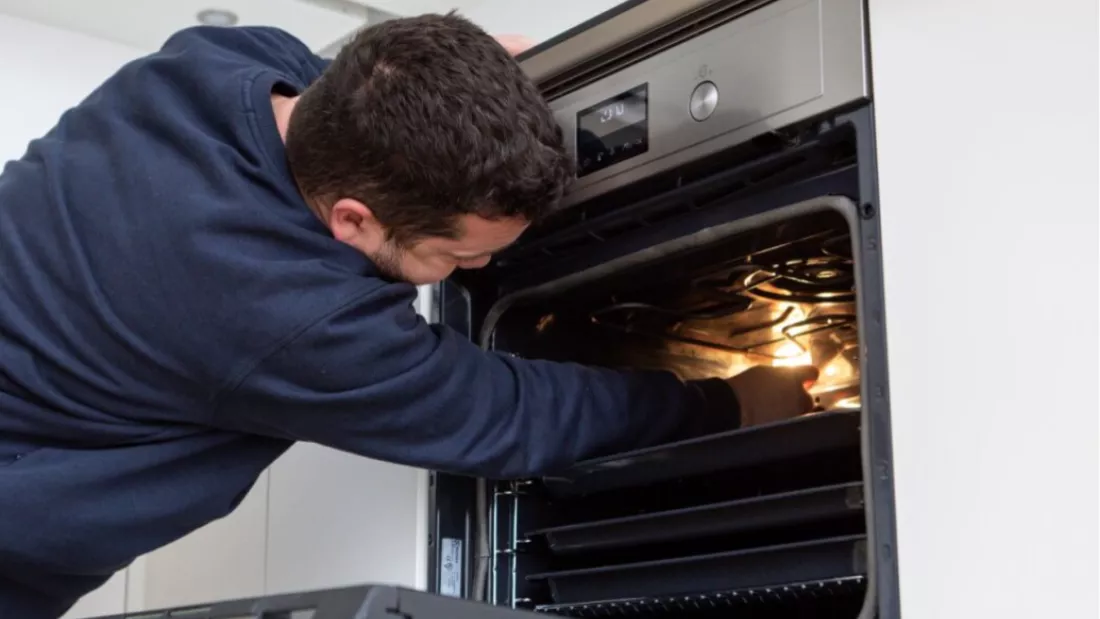
The kitchen is often the heart of the home and can also be the most challenging room to clean. Focus on deep cleaning appliances such as the oven and refrigerator, clean cabinets inside and out, and don't forget areas under and behind appliances.
Step 1 - Preparation for Cleaning:
- Start by clearing all items from the kitchen counters to have unrestricted access to all surfaces.
- Gather the cleaning supplies you'll need: dish soap, specific cleaners for glass-ceramic surfaces, sponges, cloths, and scrub brushes.
Step 2 - Deep Cleaning of Appliances:
- Oven and cooktops: Use suitable soap for deep cleaning ovens with regular enamel. For self-cleaning ovens, use the pyrolytic cleaning function. For glass-ceramic and induction cooktops, use a mixture of water and dish soap, and for ingrained dirt, use specific cleaners.
- Refrigerator: Remove all shelves and drawers, and wash them separately. Wipe all interior surfaces with a solution of water and a little dish soap. Pay extra attention to door seals.
- Freezer: Defrost and clean the freezer, especially if there is visible ice buildup.
Step 3 - Cleaning Cabinets:
- Empty the cabinets and clean them inside and out. Use a mild solution of water and dish soap to remove dirt and grease.
Step 4 - Clean under and behind kitchen appliances:
- Carefully move the appliances to clean the areas underneath and behind them. These are often overlooked places where dirt and bacteria can accumulate.
Step 5 - Final Touches:
- Go through the entire kitchen to ensure all surfaces, including countertops and handles, are clean.
- Place all items, shelves, and drawers back in their original positions.
Always remember to follow the manufacturer's instructions to avoid damaging your appliances.
Say no to limescale and mold in your bathroom:
The bathroom requires special attention to limescale deposits and mold. Use effective cleaners to tackle these problems, and ensure good ventilation afterward.
Step 1 - Choose the right cleaners:
- Gather effective cleaners specifically for limescale and mold. Vinegar and citric acid are good for removing limescale, while a mixture of water and mild detergent can be used against mold. For severe mold, choose specialized products.
Step 2 - Prepare the bathroom for cleaning:
- Remove all loose items from surfaces, such as bathroom mats, toiletries, and towels.
- Ensure good ventilation by opening windows or using an exhaust fan to prevent moisture buildup.
Step 3 - Apply cleaners:
- For limescale - Apply a mixture of vinegar or citric acid directly to areas with limescale deposits, such as faucets and showerheads. Let it sit for a few minutes to dissolve the limescale.
- For mold - Use a mixture of water and mild detergent for minor mold infestations. Apply to affected areas and scrub gently. For more severe cases, use a specialized mold removal product following the instructions on the packaging.
Step 4 - Clean thoroughly:
- Use a toothbrush to reach into small corners and crevices around the sink, toilet, and shower where dirt and limescale can accumulate.
- Scrub the treated areas thoroughly to remove all limescale and mold residues. Rinse with clean water.
Step 5 - Maintain your washing machine:
- Prevent and remove bad odors by regularly cleaning and descaling your washing machine. This includes scrubbing the detergent drawer and water intake.
- Run an empty hot wash cycle to eliminate bacteria and ensure the machine is clean and odor-free.
- Leave the door and detergent drawer open after use to promote drying and prevent bacterial growth.
Step 6 - Finishing touches and ventilation:
- Wipe all surfaces with a clean cloth to remove any remaining moisture and prevent future limescale and mold formation.
- Ensure the bathroom remains well-ventilated for several hours after cleaning to dry out the room and minimize the risk of mold growth.
Deep Cleaning the Living Room:
A thorough cleaning can transform the family's gathering spot into a clean, inviting, and brightly lit space. Follow these steps to give your living room a thorough cleaning:
Step 1 - Preparing for Cleaning:
- Start by decluttering the living room. Remove unnecessary items and organize to allow unrestricted access to all surfaces and furniture.
- Gather your cleaning tools and supplies: vacuum cleaner with various attachments, microfiber cloths, glass cleaner, and, if necessary, a carpet cleaner along with appropriate floor cleaners.
Step 2 - Vacuuming Furniture:
- Thoroughly vacuum sofas, armchairs, and other upholstered furniture. Use the vacuum cleaner's various attachments to reach into cracks and under cushions to remove dust, crumbs, and other debris.
Step 3 - Floor Cleaning:
- Depending on the type of flooring in the living room, start by sweeping or vacuuming to remove loose dirt.
- Hard floors (wood, laminate, tiles): After sweeping or vacuuming, use a damp mop with an appropriate floor cleaner to remove remaining dirt and stains.
- Carpets: Consider deep cleaning with a carpet cleaner to remove embedded dirt and dust, if necessary.
Step 4 - Window Polishing:
- Use a bucket of water with a little dish soap and the right cleaning tools, such as a squeegee or microfiber cloth, to polish the windows. This ensures a streak-free shine without leaving lint or residues.
Step 5 - Dusting Surfaces:
- Use a microfiber cloth or duster to dust all surfaces in the living room, including shelves, tables, and picture frames. Don't forget to dust lampshades and other decorative items.
Step 6 - Final Touches:
- Arrange furniture and decorative items to create a clean, inviting space.
- Consider adding a fresh scent to the room with scented candles, air fresheners, or essential oil diffusers.
Get better sleep with a deep clean of your bedroom
Giving your bedroom a thorough deep cleaning can have a significant positive effect on your sleep quality. In addition to the usual cleaning tasks such as vacuuming and wiping surfaces, this also includes a detailed cleaning of all elements that come into direct contact with your body, including bedding, curtains, mattresses, and especially pillows and blankets. It's also important to remove dust and allergens from less obvious places like under the bed and behind furniture to create a healthier sleeping environment.
Step 1 - Preparation and surface wiping
- Start by ventilating the bedroom to improve air quality.
- Remove all bedding, curtains, and other removable textiles that need to be washed.
- Wipe down all surfaces, including nightstands, dressers, and shelves to remove dust.
Step 2 - Vacuuming and floor cleaning
- Thoroughly vacuum the entire floor, especially under the bed and behind furniture where dust and allergens tend to accumulate.
Step 3 - Textile cleaning
- Wash bedding, pillows, blankets, and curtains according to the manufacturer's instructions.
- Consider the frequency of washing to save the environment and resources, especially if you do not have allergies.
Step 4: Mattress care
- Allow the mattress to breathe by not immediately covering it with a bedspread after waking up. Roll the duvet down to the foot of the bed to promote drying and ventilation.
- Rotate the mattress regularly, about every three months, to distribute wear and prevent permanent impressions. This is important for both the lifespan of the mattress and your sleeping comfort.
- Consider using a mattress protector for additional protection.
Step 5 - General tips for a healthier sleep environment
- Minimize clutter to reduce dust buildup and create a calmer atmosphere.
- Consider using hypoallergenic pillows and mattresses if you are particularly sensitive.
- Ensure good air quality by regularly ventilating and possibly using an air purifier.
A clean bedroom is the foundation of good rest, making deep cleaning an investment in your well-being. To maintain a clean and fresh bedroom, it's crucial to maintain good hygiene by regularly ventilating and maintaining textiles.
An inviting entrance free of dirt
The entrance is often the area guests see first, so make sure it's inviting and clean.
Step 1 - Minimizing indoor dirt
- Place a quality mat at each entrance to your home. A good mat reduces the amount of dirt and moisture carried inside.
- Use rubber trays for shoes to isolate slush, water, and mud from the rest of the home.
- Consider using different types of mats depending on the season, such as soft cotton mats in winter to absorb moisture and mats with nylon bristles in summer to effectively scrape dirt off shoes.
Step 2 - Cleaning and organizing the entrance
- Vacuum and wash the floors regularly to remove dirt and dust.
- Organize shoes, jackets, and other outerwear in dedicated storage solutions to keep the area neat and tidy.
- Clean surfaces, shelves, and possibly fixtures to maintain a clean and inviting environment.
By implementing these tips, you can ensure that your entrance area remains clean and inviting for both household members and guests.
Cleaning windows is also part of a good deep cleaning.
Cleaning windows is an important part of thorough deep cleaning, and with the right techniques and tools, you can achieve sparkling clean windows that enhance both the appearance and atmosphere of your home. An effective window cleaning starts with the right equipment.
Step 1 - Acquire the right equipment
- Obtain a good scraper, a squeegee, and high-quality towels.
- For a DIY approach, a soft sponge or brush can also be used.
Step 2 - Prepare the cleaning solution
- Mix cold water with a few drops of eco-labeled dishwashing detergent and a little ammonia solution. This mixture is effective in dissolving grease and dirt.
- For extra dirty windows, a stronger solution with baking soda can be used.
- Optionally, add household vinegar to the water to prevent lime deposits.
Step 3 - Apply the cleaning solution
- Use the squeegee or sponge to apply the cleaning solution to the windows. Make sure to cover the entire surface to loosen dirt and grease.
Step 4 - Scrape the window clean
- Use the scraper to remove the cleaning solution from the window. Start from the top and move downward in even, overlapping strokes to avoid streaks.
Step 5 - Wipe the edges
- Use a clean towel or microfiber cloth to wipe the edges and any streaks left after using the scraper.
Step 6 - Inspection and finishing
- Check the windows for streaks or missed areas. Use a dry microfiber cloth to polish these areas for a sparkling result.
Final pro tips
- Avoid cleaning windows in direct sunlight, as this can cause quick drying and streaks.
- Consider regular window cleaning to avoid buildup of dirt and to make the cleaning process easier.
- Be environmentally conscious by choosing eco-friendly cleaning products and recycling water when possible.
By following these steps, you can achieve professionally clean windows that positively contribute to the atmosphere and aesthetics of your home.
Remove hair from the four-legged family members
It can sometimes be a bit of a challenge to keep the home clean when our four-legged family members shed. Fortunately, there are several effective methods to make this task easier and more efficient, ensuring a clean home.
Step 1 - Vacuum furniture
- Choose the right attachment: Start by selecting a vacuum attachment that best suits the type of fabric on your furniture.
- Thorough vacuuming: Vacuum sofas, chairs, and other furniture thoroughly to capture as much hair as possible.
Step 2 - Use a lint roller or rubber glove
- Lint roller: If the vacuum doesn't remove all the hair, a lint roller can be used to gently pick up remaining hair without damaging the fabric.
- Rubber glove: Alternatively, a damp rubber glove can be used to rub over the fabric. The static electricity that occurs will attract the hairs.
Step 3 - Clean clothes and textiles
- Foam laundry balls in the washing machine: Use foam laundry balls along with the clothes in the washing machine to collect hair during the wash.
- Dryer: A subsequent turn in the dryer can remove more hair from the clothes.
Step 4 - Remove remaining hair from clothes
- Scrub sponges: For any remaining hair on clothes, use a scrub sponge (not the rough side) to gently remove hair.
- Lint roller for finishing touch: Finish by using the lint roller to ensure that all hair is removed from the clothes.
The final step of the deep cleaning - mopping the floor
Regardless of the type of flooring you have, there are some basic steps that ensure effective and gentle cleaning, protecting your floor and extending its lifespan. It starts with thorough vacuuming or dry mopping to remove loose dirt and dust, preparing the floor for wet cleaning.
Step 1 - Prepare the floor for mopping
- Start with thorough vacuuming or dry mopping to remove loose dirt and dust. This step is important to prepare the floor for wet cleaning.
Step 2 - Choose the right cleaning solution
- Tailor the cleaning solution to the type of floor: Use a mixture of water and soap flakes for hardwood floors. This ensures gentle and effective cleaning without leaving greasy surfaces.
Step 3 - Now you're ready to mop the floor
- Apply the cleaning mixture with a mop, making sure to wring the mop head well so it's damp but not soaking wet. Mop the floor with light, even strokes.
Step 4 - Dry the floor thoroughly
- After mopping, it's essential to dry the floor thoroughly with a clean, dry mop or cloth. This prevents water damage and ensures that the floor dries quickly and without streaks.
Step 5 - Eco-friendly cleaning products
- Consider eco-labeled cleaning products to take care of both your floor and the environment. These products offer effective cleaning without harmful chemicals.
Pro tips
- Always test the cleaning solution on a small, less visible area of the floor first to ensure it doesn't damage the surface.
- Avoid excessive use of water, especially on wood and laminate floors, as it can lead to permanent damage.
- Regularly maintain mopping as part of your deep cleaning routine to ensure a clean and inviting home.
By following these steps, you can ensure effective and gentle cleaning of your floors, protecting and extending their lifespan.
Balder's final tips for deep cleaning your home
After a comprehensive deep cleaning of your home, it's crucial to establish a maintenance plan. This ensures that you can maintain cleanliness in the home with minimal effort. Integrating cleaning habits into your daily routine helps prevent the accumulation of dirt and dust, making future deep cleanings less overwhelming.
Environmental friendliness should be a focus when choosing your cleaning products. By using products with eco-labels such as the EU Flower or the Swan Label, you not only support a healthier environment in your home but also the well-being of our planet. Alternative cleaning solutions, such as vinegar, citric acid, and baking soda, offer effective alternatives to chemical cleaners and are gentle on both the home and nature.
When cleaning becomes a family project, you can turn it into a cozy activity. By involving the whole family in the cleaning process, the workload is distributed, and it creates a great opportunity to spend quality time together. This can be a fun and educational way for children to learn about responsibility and cooperation.